Connect Azure
Connecting Azure gives Orbit a read-only service principal (for resource inventory) and a FOCUS cost export in blob storage (for cost). This guide supports both tenant-wide (all subscriptions) and single-subscription onboarding.
You can set up the Azure side in two ways: run the Cloud Shell script, which does every Azure step and saves the values Orbit asks for, or follow the Azure portal steps by hand.
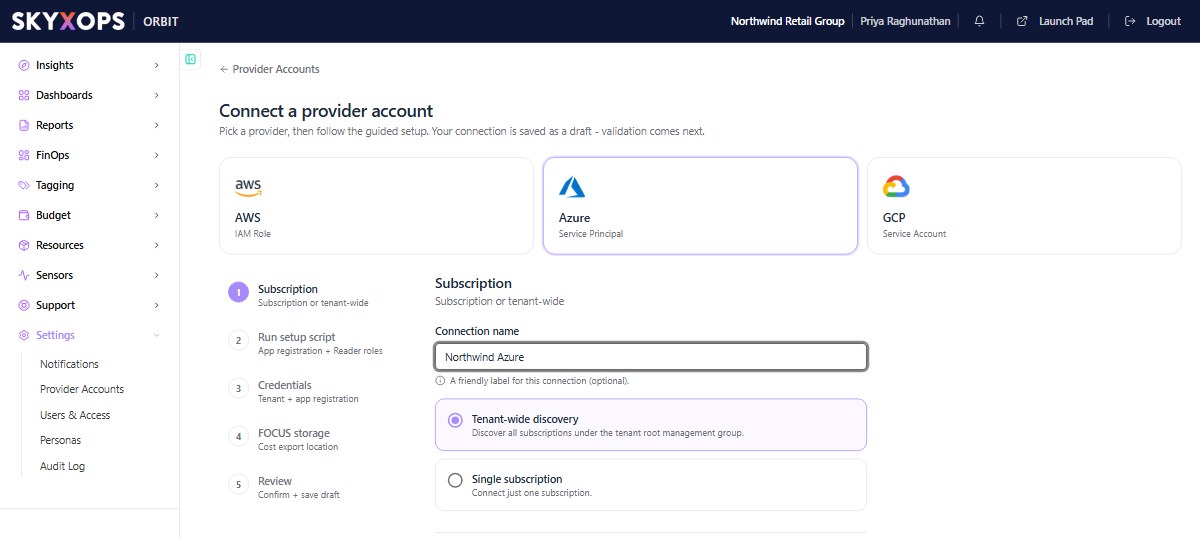
In Settings > Provider Accounts > Connect account, pick Azure and choose your scope. The wizard then collects the values you create below.
Before you begin
Check your billing agreement type
Orbit uses Azure FOCUS (FinOps Open Cost and Usage Specification) exports. Verify your agreement supports this:
| Agreement type | FOCUS export support | Notes |
|---|---|---|
| Enterprise Agreement (EA) | Supported | Billing account (enrollment), Department, Enrollment account, Subscription and Resource Group scopes |
| Microsoft Customer Agreement (MCA) | Supported | All scopes including Billing Profile |
| MCA via Partner (MPA) | Supported | Customer, Subscription, Resource Group |
| Pay-As-You-Go on a Microsoft Customer Agreement | Supported | Same scopes as MCA |
| Pay-As-You-Go, older agreement (Microsoft Online Services Program) | Not supported | Microsoft offers no FOCUS exports for this agreement |
| Azure Sponsorship | Not supported | Use Azure Sponsorship Portal |
| Microsoft for Startups | Not supported | Cost Management not available |
| Classic CSP | Not supported | Must transition to MCA |
FOCUS exports do not support Management Group scope. For tenant-wide, create one export at the billing scope that covers your subscriptions: the Billing Account or a Billing Profile (MCA), or the Billing Account (EA). Don't create one export per subscription in the same folder: Orbit reads one Folder prefix per connection, and exports that share a folder overwrite each other's files.
The Cloud Shell script creates the export at your MCA billing account, which covers all its billing profiles. If your subscriptions are billed on more than one billing account, connect each subscription separately (Single subscription) for now.
Find your agreement type
- In the Azure portal, go to Cost Management + Billing and open your billing account
- Select Properties in the left menu
- Look at the Type field (some accounts label it Agreement type), for example Microsoft Customer Agreement
Prerequisites
Required Azure roles
| Role | Purpose | Single subscription | Tenant-wide |
|---|---|---|---|
| Application Administrator | Create the service principal | Microsoft Entra ID | Microsoft Entra ID |
| Owner | Create the storage account and assign roles. For a single subscription, also create the cost export | The subscription | The Tenant Root Group |
| Owner, contributor or reader (billing role, MCA) | Create the tenant-wide cost export | Not needed | The billing account. With the Azure portal steps, a role on the billing profile is also enough |
You don't need Application Administrator if your tenant lets every user register apps. Instead of Owner, you can have Contributor plus User Access Administrator at the same scope.
Enable cost visibility (required for some agreements)
Enterprise Agreement (EA)
The EA administrator must enable view charges for account owners:
- Go to Cost Management + Billing, then select your billing account
- Navigate to Policies
- Enable AO view charges (Account Owner view charges). If you use department scope, also enable DA view charges (Department Admin view charges)
Without this, you'll see error: AccountCostDisabled or DepartmentCostDisabled
Microsoft Customer Agreement (MCA)
A Billing Profile Owner must let subscription users see Azure usage charges:
- Go to Cost Management + Billing, then select your billing account
- Select Billing profiles, then choose your profile
- Navigate to Policies
- Under Azure charges, set Azure usage charges to Yes
CSP Customer
Your CSP partner must enable cost visibility:
- Partner signs into Azure Portal with their CSP credentials
- Goes to Cost Management + Billing > Billing Scopes
- Selects your customer tenant
- Under Settings > Policies, enables cost visibility
Without this, you cannot access Cost Management in your tenant.
New subscription?
New Azure subscriptions take up to 48 hours to appear in Cost Management. If you just created the subscription, wait before proceeding.
Set up Azure
Pick one method. Each one ends with the seven values Orbit asks for.
- Cloud Shell script
- Azure portal
The setup script, SKYXOPS-Azure-Setup.ps1, runs in Azure Cloud Shell (PowerShell), which already has everything it needs. It asks a few questions and shows you a plan. Nothing changes in Azure until you approve the plan. Then it creates the Azure side and saves the values Orbit asks for in one file.
- Sign in to the Azure portal with an account that has the roles in Prerequisites.
- The script works in the Azure public cloud only.
- If you use an existing storage account, it must allow public network access from all networks, and its Permitted scope for copy operations must stay From any storage account. The script refuses a storage account whose network access is restricted, and it never changes these settings.
The script's Tenant-wide mode works only with a Microsoft Customer Agreement (MCA):
- The subscriptions your account can see must be billed on one billing account. Several billing profiles under it are fine. If they're billed on more than one billing account, Plan stops before anything changes. For now, connect each subscription separately (Subscription mode).
- Your account needs the Billing account owner, contributor or reader role. A billing profile role isn't enough. See Prerequisites.
- A Global Administrator usually has to elevate access before anyone can assign roles on the Tenant Root Group.
- The export covers the whole billing account: every billing profile under it, and every subscription billed on it, including subscriptions from other tenants. Orbit's cost totals include them all. If the billing profiles use different currencies, the export has costs in each currency.
- Plan lists any subscription it can't cover under Not covered, for example one on an older pay-as-you-go agreement. Orbit still scans its resources, but its costs won't appear.
- Orbit scans every subscription under the Tenant Root Group, including ones your account can't see. Their costs appear only if they're billed on this billing account.
- Connect each tenant once. If Orbit already has a connection for any of these subscriptions, remove it first.
For an Enterprise Agreement (EA), use the Azure portal tab.
Step 1: Open Cloud Shell and upload the script
- Download SKYXOPS-Azure-Setup.ps1.
- In the Azure portal, open Cloud Shell from the top bar and choose PowerShell.
- Select Manage files > Upload and choose
SKYXOPS-Azure-Setup.ps1. Cloud Shell saves it in your home folder, which is where the prompt starts. Run every command below from there.
You don't need to mount a storage account for Cloud Shell. Without one, Cloud Shell deletes your files when the session ends, so Step 4 saves the credentials file to your computer.
Step 2: Run Plan
./SKYXOPS-Azure-Setup.ps1 -Action Plan
Plan shows the tenant you're signed in to, then asks up to four questions. When it lists choices, type the number of your choice.
- Choose the connection mode:
1for Subscription,2for Tenant-wide. - Choose the subscription to connect. In Tenant-wide mode, it's the subscription that holds the storage account. Plan skips this question if you can see only one subscription.
- For storage, pick a new storage account just for SKYXOPS, or one of your existing storage accounts in that subscription. Plan skips this question if that subscription has no storage accounts (it creates a new one), or if an earlier run of the script created one (it reuses it).
- For a new storage account, type a region name such as
westeurope, or press Enter foreastus. For an existing storage account, Plan asks which one instead.
Plan remembers your answers and prints a summary, including the Folder prefix you'll enter in Orbit. Plan changes nothing in Azure. Check that the Tenant line shows the tenant you want to connect. If it shows another tenant, switch the Azure portal to the right directory, open Cloud Shell again and run Plan with -StartOver (below).
Running Plan again reuses your answers. To change an answer before Apply, run Plan with -StartOver, and it asks the questions again:
./SKYXOPS-Azure-Setup.ps1 -Action Plan -StartOver
-StartOver works only before Apply has set anything up.
Step 3: Run Apply
./SKYXOPS-Azure-Setup.ps1 -Action Apply
Apply shows the plan again. To approve it, type APPLY, a space and your tenant ID, exactly as the script shows. Apply then creates everything listed in What the script creates, and prints the Folder prefix and the date the client secret expires.
If Apply stops with an error, fix the cause and run Apply again. It reuses what it already created, and it never replaces an existing client secret.
Step 4: Save the credentials file to your computer
Do this straight after Apply. Cloud Shell can delete its files when the session ends, and a session ends after 20 minutes without typing.
download $HOME/SKYXOPS-Credentials.json
This sends the file to your browser as a download.
SKYXOPS-Credentials.json holds the seven values for Orbit, including the client secret. Keep it private. Apply writes this file once, when it first finishes, and never again. If you lose it before the values are in Orbit, create a new client secret on the app (see the note below). The app's Overview page in Microsoft Entra ID and Plan's summary show the other values.
Next, enter the values in Orbit, as described in Enter values in Orbit.
Apply prints the expiry date. You can also find it on the app's Certificates & secrets page. Before then, create a new client secret on the same app: Microsoft Entra ID > App registrations > your skyxops-cost-reader-… app > Certificates & secrets > New client secret. In Orbit, open the connection, select Edit connection, paste the new secret's Value (not its Secret ID) and select Save & re-validate. Delete the old secret only after Orbit shows the connection as Verified.
If you come back in a new Cloud Shell session and your files are gone:
- If you saved
SKYXOPS-Credentials.json, the Azure side is done. Don't run the script again. Go to Enter values in Orbit. - If Apply finished (it printed the date the client secret expires) but you didn't save the file, create a new client secret on the app, as described above. You can run Plan again to see its summary, but don't run Apply again.
- If Apply didn't finish, upload the script, then run Plan and Apply again. If Apply stops with
AppNameCollision, contact SKYXOPS support.
What the script creates
| Subscription mode | Tenant-wide mode | |
|---|---|---|
| App registration | skyxops-cost-reader- + the first 8 characters of the subscription ID | skyxops-cost-reader- + the first 8 characters of the tenant ID |
| The app's roles | Reader and Cost Management Reader on the subscription | Reader and Cost Management Reader on the Tenant Root Group |
| Client secret | Expires after 90 days | Expires after 90 days |
| Storage account, if new | stskyxops + 12 letters and digits, in resource group rg-skyxops-focus: Standard, LRS, TLS 1.2, HTTPS only, no anonymous access, public network access on | Same, in the subscription you chose in Plan |
| Container | skyxops-focus, private. The app gets Storage Blob Data Reader on this container only | Same |
| Cost export | skyxops-focus- + the first 8 characters of the subscription ID, at the subscription | skyxops-focus- + a 12-character code made from your billing account ID, at the billing account |
| Export settings | Daily, month-to-date, FOCUS 1.0r2, Parquet with Snappy compression, overwrite on, active for 5 years | Same |
| Folder prefix | exports/ + the export's name | tenant-exports/ + the export's name |
| Export's identity | Storage Blob Data Contributor on the container only | Same |
Apply also registers the Microsoft.Storage and Microsoft.CostManagementExports resource providers in the storage subscription if they aren't registered yet. A new storage account adds a small Azure charge.
If the script stops
When a step stops, the script prints SKYXOPS setup stopped: and a reason, which usually starts with a code. The most common ones:
| Code | What it means | What to do |
|---|---|---|
MissingOperatorPermission | Your account lacks a permission at the scope the message names | Get the role from Prerequisites for that scope (or activate it, if your organization uses Privileged Identity Management), then run the same step again |
MissingBillingExportPermission, or AuthorizationFailed during REST GET while Plan asks its questions | Tenant-wide: your account has no role on the billing account | Get the Billing account owner, contributor or reader role. A billing profile role isn't enough |
MultipleBillingAccounts | Tenant-wide: your subscriptions are billed on more than one billing account | Connect each subscription in Subscription mode for now |
UnsupportedBillingAgreement | Tenant-wide: none of the subscriptions you can see is billed on a Microsoft Customer Agreement (for example EA, older pay-as-you-go or Visual Studio subscriptions) | Use Subscription mode, or the Azure portal tab for an EA |
BillingAccountChanged | Tenant-wide: your subscriptions moved to another billing account after Plan | Before Apply: run Plan with -StartOver. After Apply: contact SKYXOPS support |
WrongTenant | Cloud Shell is signed in to a different tenant from the one in your saved answers | Switch the Azure portal to the tenant you planned for, open Cloud Shell again and run the same step |
SubscriptionUnavailable | A subscription in your saved answers is no longer enabled, or your account can't see it | Check the subscription in the Azure portal. If it was cancelled, contact SKYXOPS support |
UnsupportedNetworking | The existing storage account limits network access | Run Plan with -StartOver and choose a new storage account |
StorageNameUnavailable | The storage account name is taken in Azure | Run Plan with -StartOver and choose an existing storage account |
AppNameCollision | An app with the script's name already exists, usually from an earlier Apply | If that Apply finished, don't run the script again: see the tip in Step 4. Otherwise, contact SKYXOPS support |
StartOverAfterApply | You ran Plan with -StartOver after Apply had set things up | Run Apply again to finish, or contact SKYXOPS support |
StateConfigMismatch | Your saved answers no longer match what Apply already set up | Contact SKYXOPS support |
IncompatibleExport | An export with the script's name already exists, with different settings | Contact SKYXOPS support |
PartialSetup | The cost export couldn't be set up. The message says why | Fix the cause and run Apply again |
Any other code, followed by during | Azure refused one of the script's commands. The first word is Azure's error code, for example AuthorizationFailed | Check the roles in Prerequisites, then run the same step again. Don't create a second app or storage account |
Step 1: Create resource group
- In the Azure portal, go to Resource Groups > Create
- Configure:
- Select your target subscription in Subscription
- Enter
rg-skyxops-costas the Name - Select your preferred region in Region
- Click Review + create, then Create
If your organization requires tags on resources, add them now. Common tags are Environment, CostCenter, Owner and Project.
Troubleshooting: RequestDisallowedByPolicy
Error: Azure Policy prevents resource creation without required tags.
Solution:
- Check with your Azure administrator for required tags
- Add required tags during creation
- Or request a policy exemption for the resource group
Step 2: Create storage account
- Go to Storage accounts > Create
- Configure Basics:
- Set Resource group to
rg-skyxops-cost - For Storage account name, use
stskyxops+ 4 to 6 random numbers (e.g.,stskyxops8472) - Use the same Region as the resource group
- Set Primary service to Azure Blob Storage or Azure Data Lake Storage
- Set Performance to Standard
- Set Redundancy to Locally-redundant storage (LRS)
- Set Resource group to
- On the Security tab, keep the defaults. Require secure transfer for REST API operations is on, Minimum TLS version is Version 1.2, and Permitted scope for copy operations is From any storage account. Microsoft requires this last setting for cost exports.
- Click Review and create, then Create
Troubleshooting: StorageAccountAlreadyTaken
Error: Storage account name must be globally unique.
Solution: Choose a different name with more random numbers (e.g., stskyxops847291)
Step 3: Create container
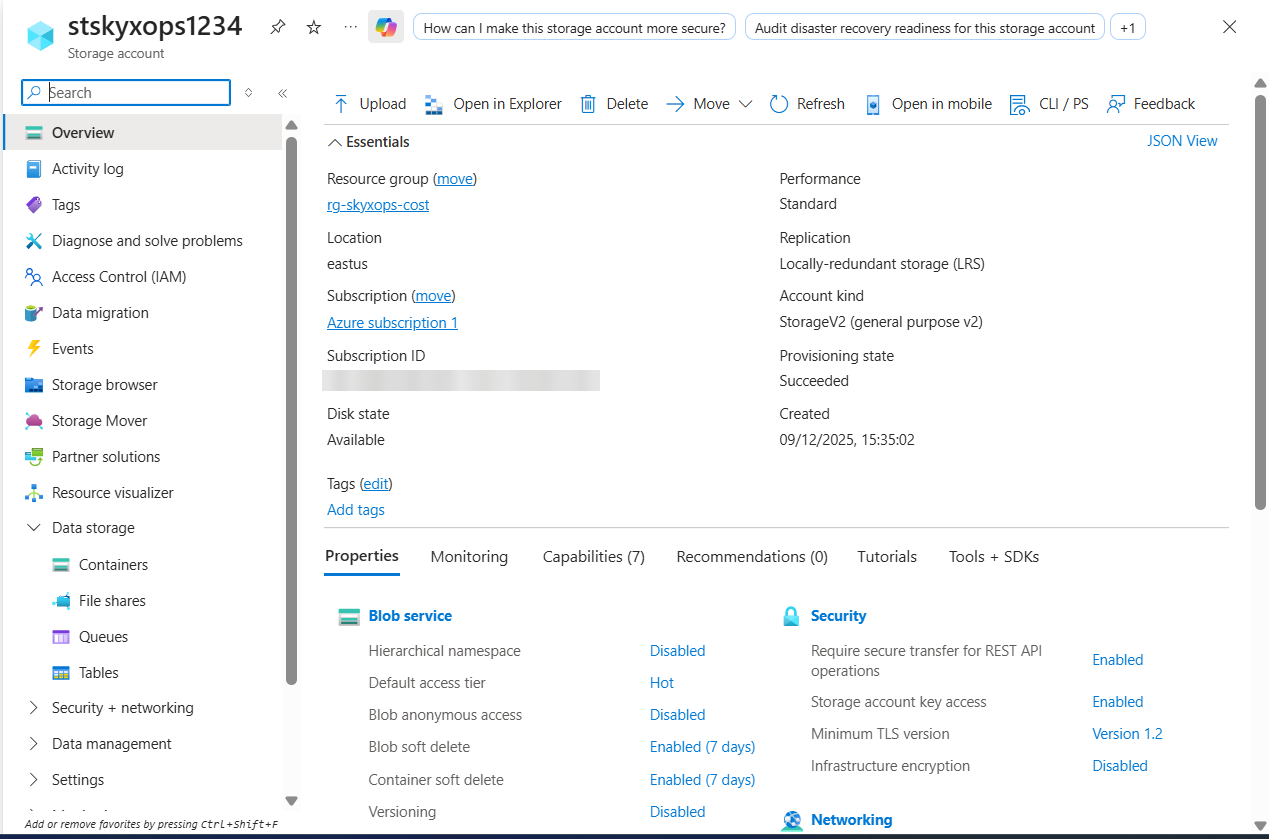
- Open your new storage account
- In the left menu, under Data storage, click Containers
- Click + Add container
- Enter
skyxops-cost-exportsas the Name and set Anonymous access level to Private (no anonymous access) - Click Create
Step 4: Create service principal
- Go to Microsoft Entra ID > App registrations > New registration
- Enter
spn-skyxops-costas the Name. For Supported account types, select Single tenant only (it shows your directory's name) - Click Register
Copy the Application (client) ID and the Directory (tenant) ID now. You'll need them for Orbit.
- Go to Certificates & secrets > Client secrets > New client secret
- Enter
skyxops-accessas the Description. Set Expires to 24 months (recommended) or per your security policy - Click Add
Copy the secret's Value immediately. It won't be shown again.
Troubleshooting: Insufficient privileges
Error: Cannot create app registration.
Possible causes:
- You don't have the Application Administrator role
- Azure AD restricts app registrations to admins only
Solutions:
- Request Application Administrator role from your Azure AD admin
- Ask admin to create the service principal for you
- Check Azure AD > User settings > App registrations setting
Step 5: Assign Reader role
This allows Orbit to read your Azure resources and costs.
Choose your scope:
| Scope | Use case | Path |
|---|---|---|
| Tenant (Recommended) | Monitor all subscriptions | Management groups > Tenant Root Group > Access control (IAM) |
| Single Subscription | Monitor one subscription | Subscriptions > [Your Sub] > Access control (IAM) |
Steps:
- Navigate to the appropriate scope (see table above)
- Click Access control (IAM) > Add > Add role assignment
- Select Role: Reader
- Click Next
- Select Members: click + Select members, search for
spn-skyxops-cost, then select it - Click Review + assign
Troubleshooting: AuthorizationFailed
Error: Cannot assign role.
Solutions:
- You need Owner or User Access Administrator role at the target scope
- For Tenant Root Group, you may need Global Administrator to grant access first
Step 6: Assign storage role
This allows Orbit to read the exported cost data.
- Go to your storage account (
stskyxops####) - Click Access control (IAM) > Add > Add role assignment
- Select Role: Storage Blob Data Reader
- Click Next
- Select Members: click + Select members, search for
spn-skyxops-cost, then select it - Click Review + assign
Step 7: Create cost export
-
Go to Cost Management + Billing
-
Select your scope:
Onboarding type Scope to select Single Subscription Select your subscription Tenant (EA) Select Billing Account, then your EA enrollment Tenant (MCA) Select Billing Profile warningDo not select Management Group. FOCUS exports are not supported at this scope.
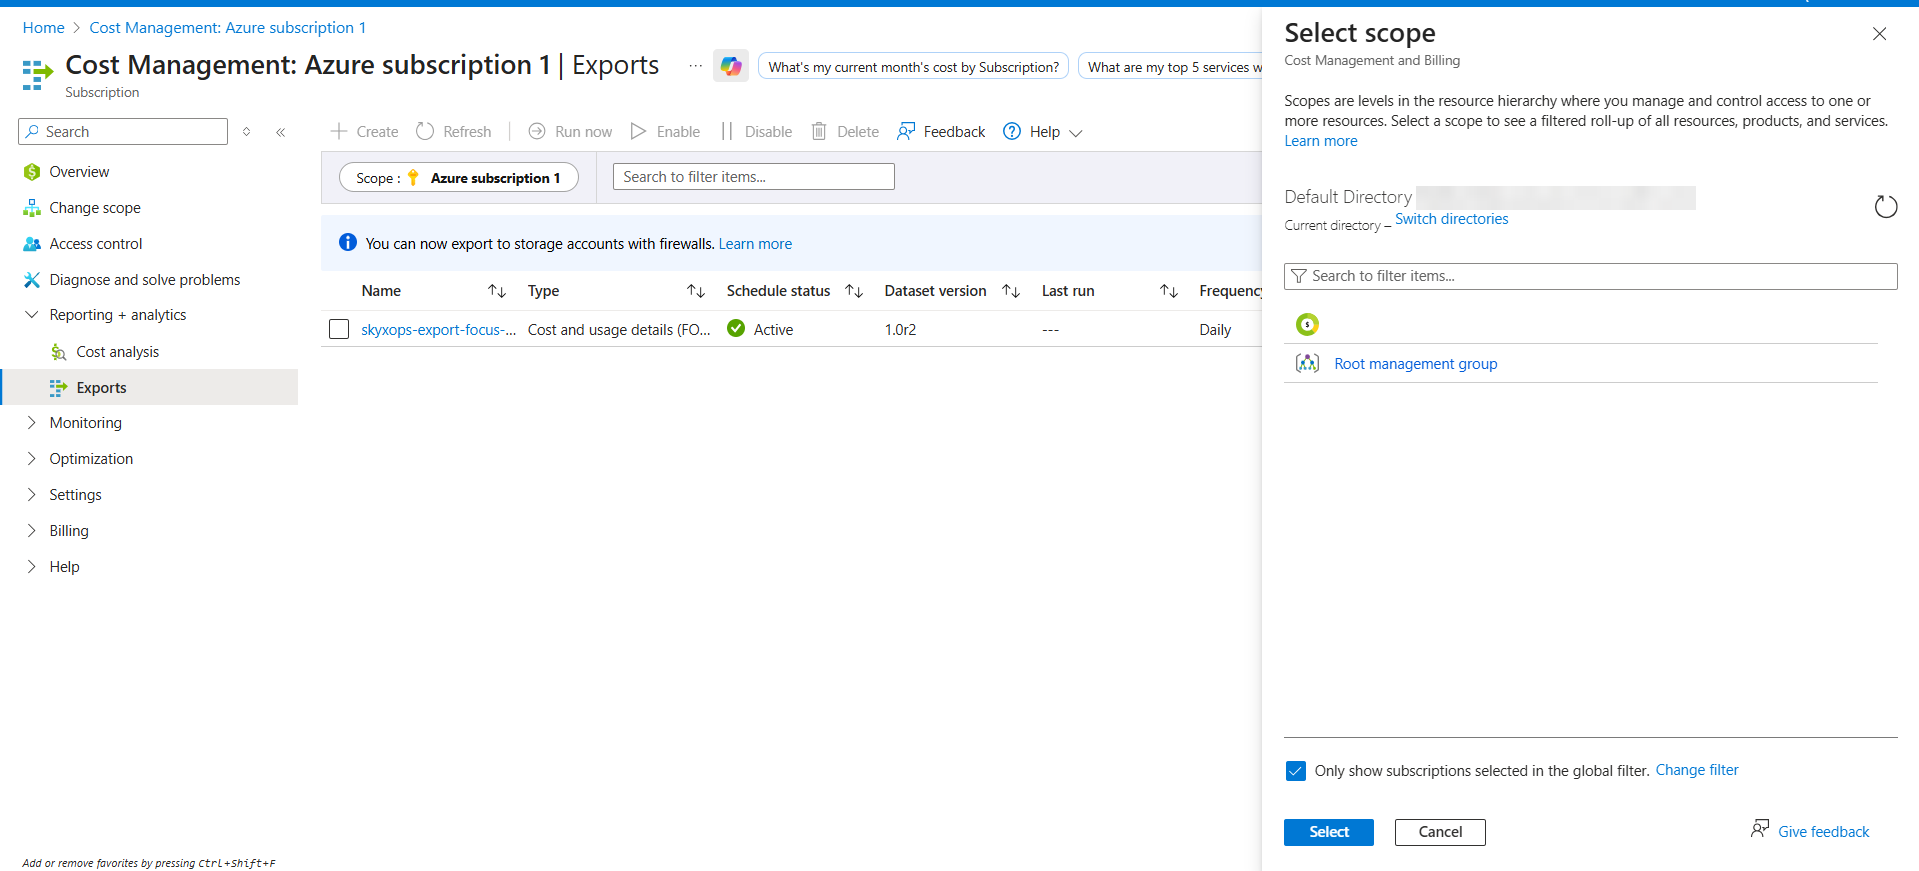
- In the left menu, click Exports, then Create
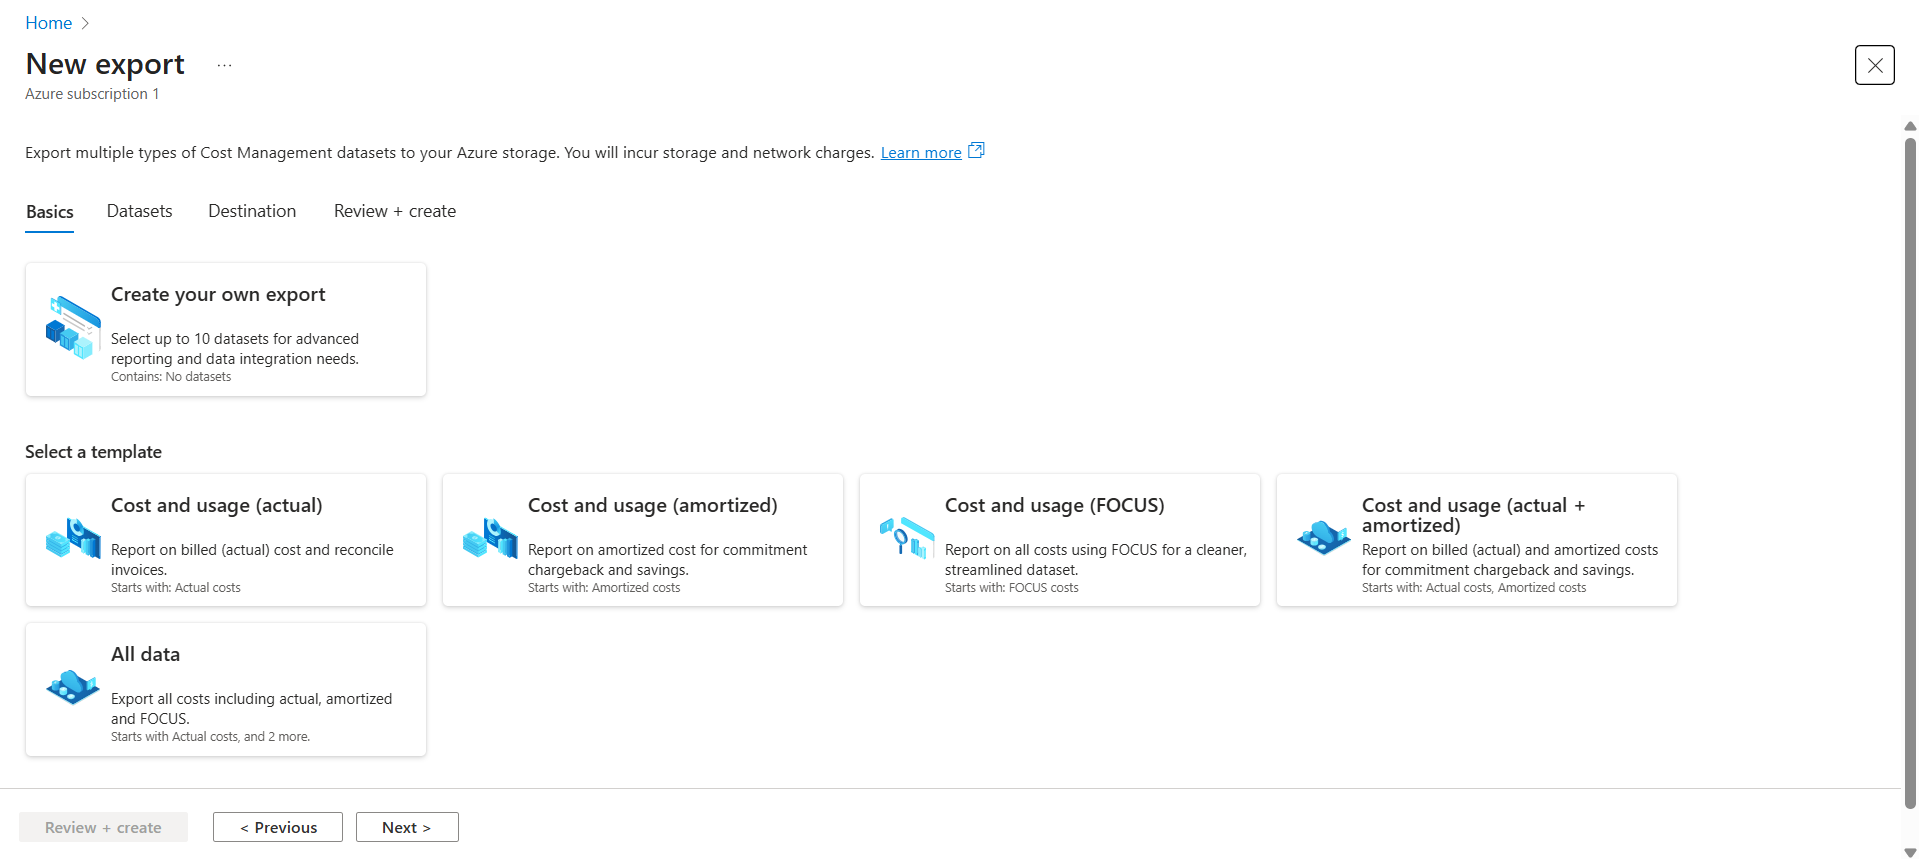
On the Basics tab:
- Under Select a template, click Cost and usage (FOCUS)
- Click Next
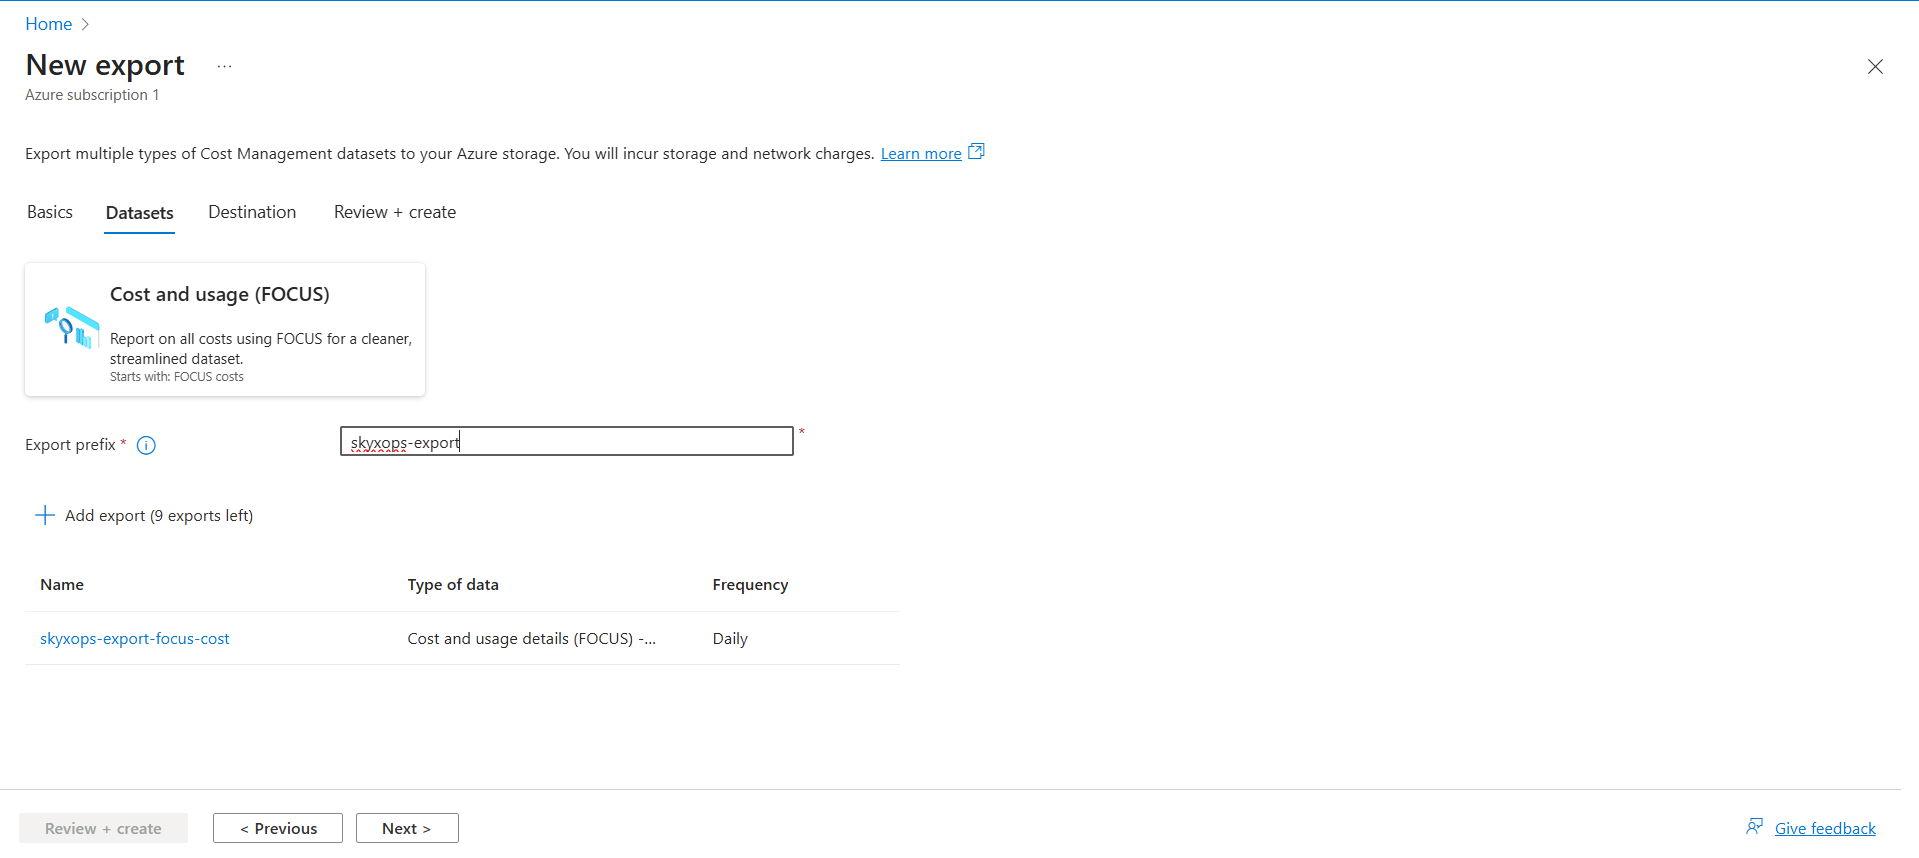
On the Datasets tab:
- In Export prefix, enter
skyxops-export. Azure names the export with this prefix followed byfocus-cost, for exampleskyxops-export-focus-cost. Note the export's name: you need it for the Folder prefix in Orbit. - Click Next
On the Destination tab:
-
Configure:
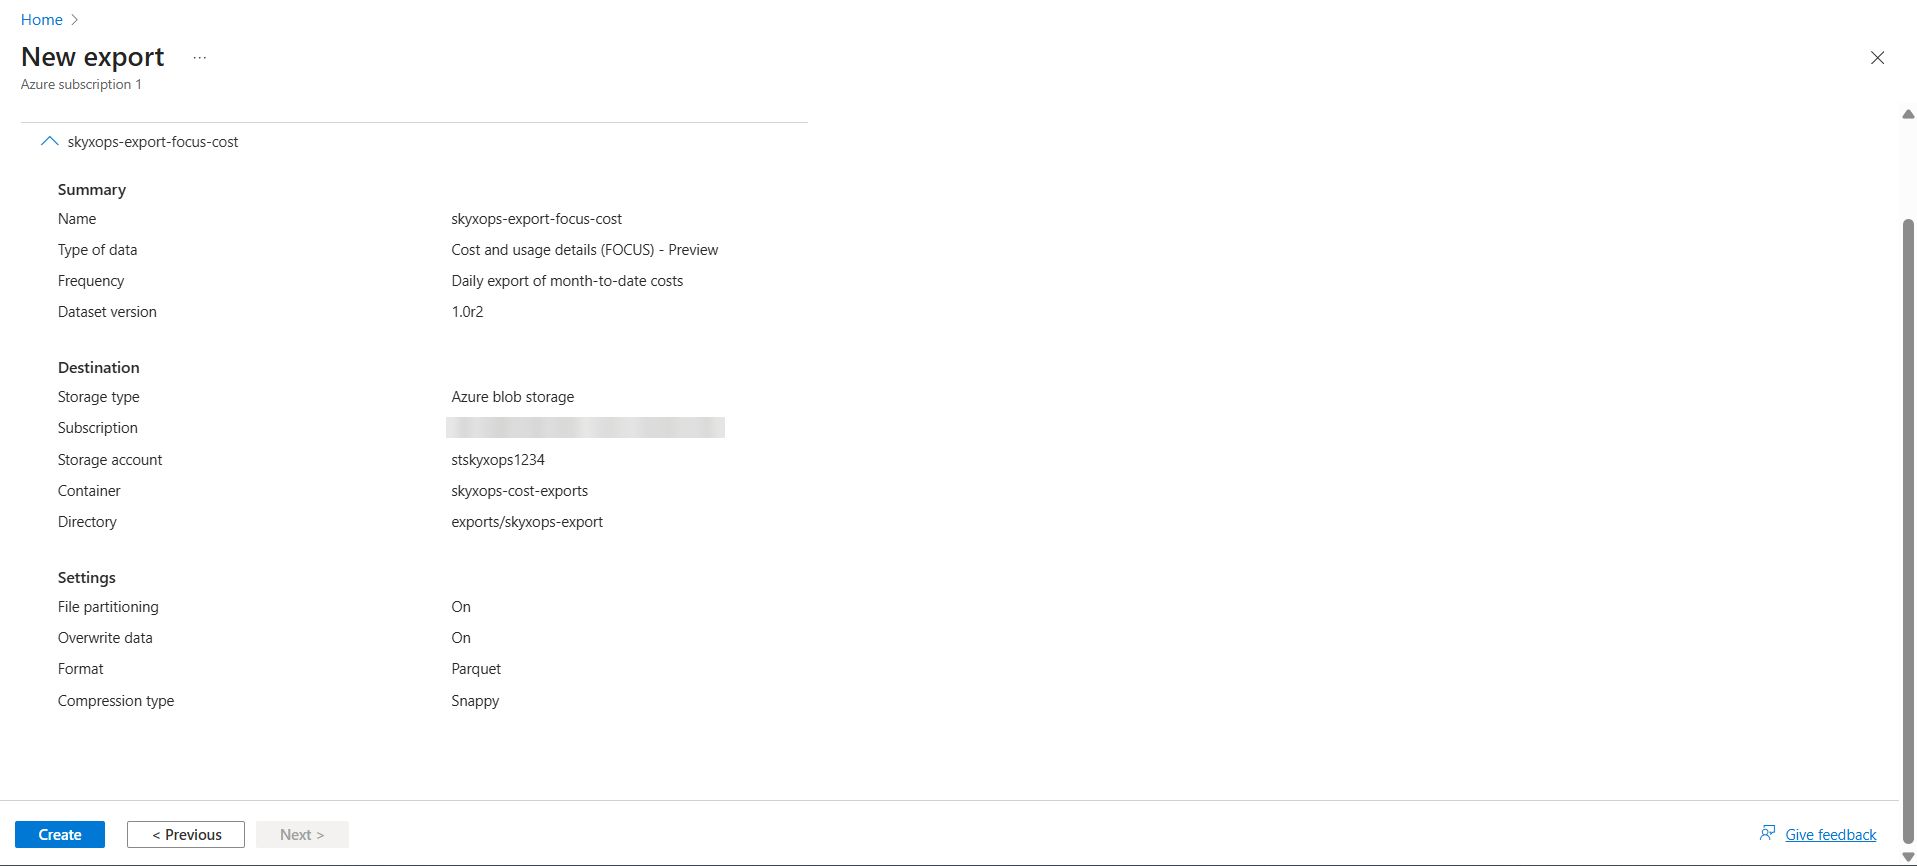
Setting Value Storage type Azure blob storage Destination and storage Use existing Subscription Select subscription with your storage account Storage account Select your account (e.g., stskyxops8472)Container skyxops-cost-exportsDirectory exports/skyxops-exportFormat Parquet Compression type Snappy File partitioning Enabled Overwrite data Enabled -
Click Next

On the Review + create tab:
- Check the dataset is Cost and usage details (FOCUS) with Dataset version 1.0r2
- Click Create
Troubleshooting: RP registration in progress
Error: "RP registration in progress" or resource provider not registered.
Cause: Azure is registering the Microsoft.CostManagementExports resource provider.
Solution:
- Wait 5 minutes and click Create again
- If it persists beyond 10 minutes, manually register:
- Go to Subscriptions, select the subscription, then Resource providers
- Search for
Microsoft.CostManagementExports - Click Register
Troubleshooting: Not supported
Error: "Cost management is not supported for this account type"
Causes:
- Azure Sponsorship or Microsoft for Startups subscription
- Classic CSP subscription
- New subscription (less than 48 hours old)
Solutions:
- Check your billing agreement type
- For new subscriptions, wait 48 hours
- For CSP, make sure your partner has enabled cost visibility
Troubleshooting: AccountCostDisabled / DepartmentCostDisabled
Error: EA administrator hasn't enabled Cost Management view charges.
Solution: Contact your EA administrator to enable AO view charges (Account Owner) and, if applicable, DA view charges (Department Admin).
Step 8: Run export now (optional)
To verify the export works:
- Go to Cost Management > Exports
- Select your export (for example
skyxops-export-focus-cost) - Click Run now
- Open the export. When its Run history shows Succeeded, the files are in your storage container
- First data may take up to 24 hours for the initial export
- Daily exports run automatically, and their timing varies (not at a fixed time)
- With Run now, Microsoft says data should be available within 4 hours after a run starts
Enter values in Orbit
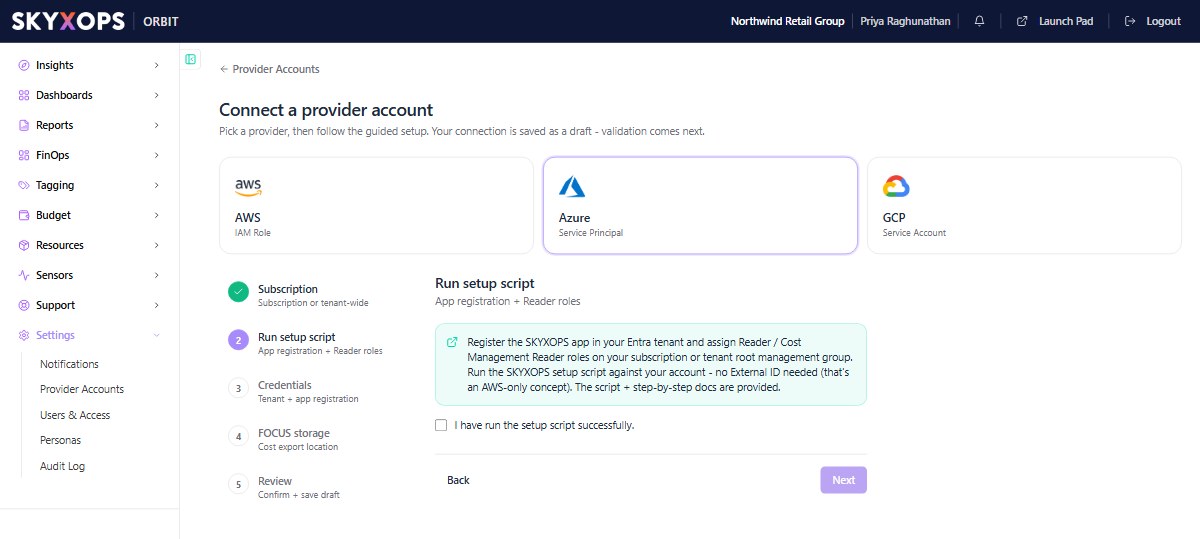
In Orbit, go to Settings > Provider Accounts > Connect account and pick Azure. The wizard has five steps:
-
On the Subscription step, choose Single subscription and enter the Subscription ID, or choose Tenant-wide discovery. Orbit selects Tenant-wide discovery by default. If you used the script, choose the mode you picked in Plan: Subscription is Single subscription, Tenant-wide is Tenant-wide discovery.
-
On the Run setup script step, tick I have run the setup script successfully. Tick it too if you used the Azure portal steps.
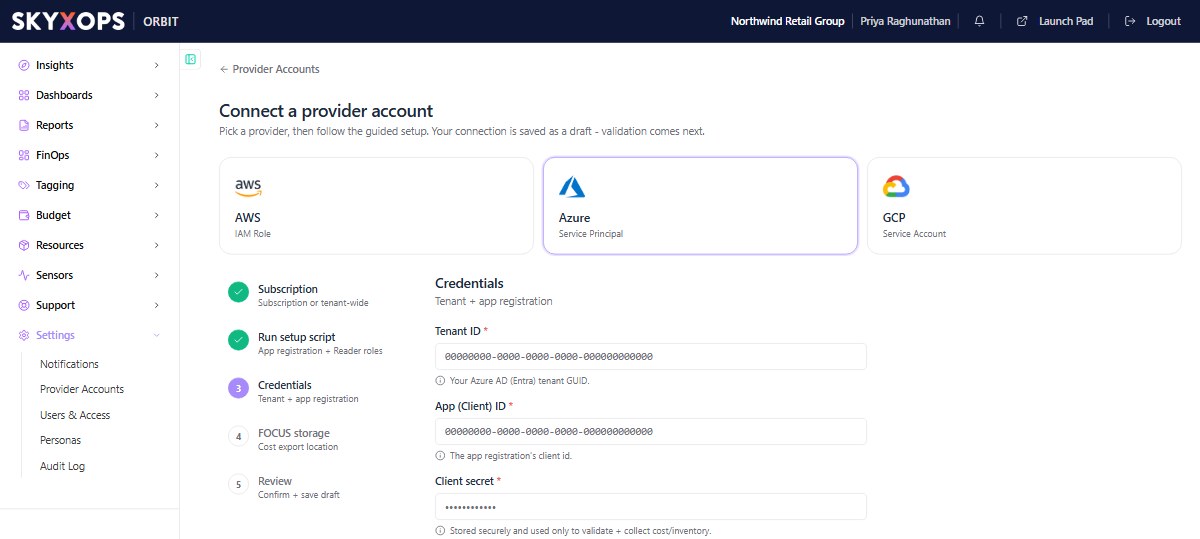
-
Enter the Tenant ID, App (Client) ID and Client secret on the Credentials step.
-
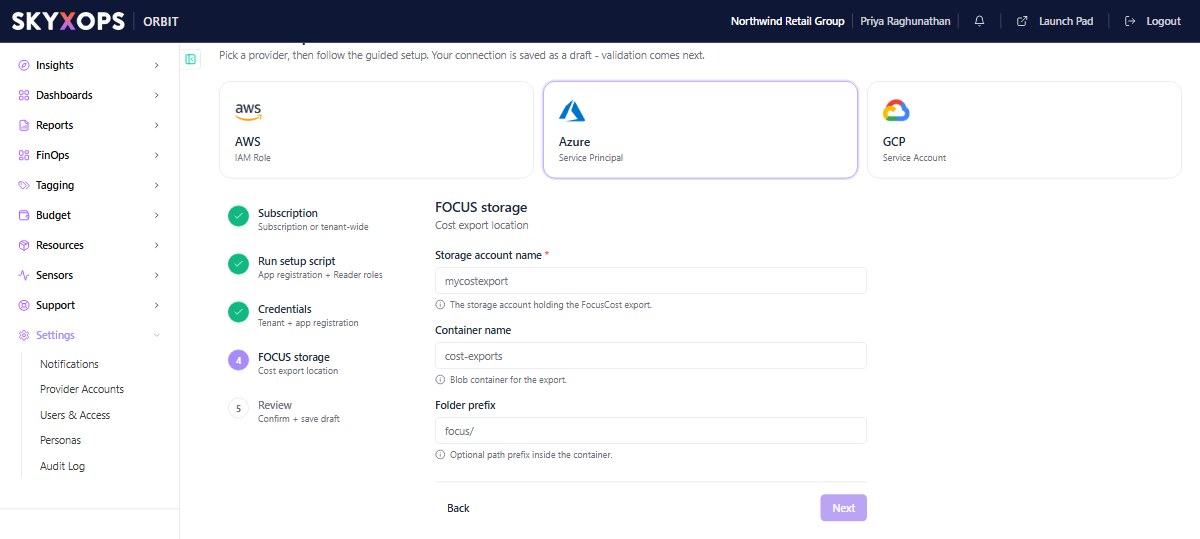
Enter the Storage account name, Container name and Folder prefix on the FOCUS storage step.
-
On the Review step, select Connect. Orbit saves the connection and validates it. New roles can take up to 10 minutes to start working, and roles on the Tenant Root Group can take longer. If validation fails straight after setup, wait and try again.
If you used the script, SKYXOPS-Credentials.json holds all seven values under the field names below. In Tenant-wide mode, its Subscription ID says Tenant-wide: choose Tenant-wide discovery instead.
If you used the Azure portal, the table gives the step in the Azure portal tab where you get each value.
| Field | Example | Source (Azure portal tab) |
|---|---|---|
| Subscription ID | xxxxxxxx-xxxx-xxxx-xxxx-xxxxxxxxxxxx | Only for Single subscription |
| Tenant ID | xxxxxxxx-xxxx-xxxx-xxxx-xxxxxxxxxxxx | Step 4: Directory (tenant) ID |
| App (Client) ID | xxxxxxxx-xxxx-xxxx-xxxx-xxxxxxxxxxxx | Step 4: Application (client) ID |
| Client secret | xxxxxxxxxxxxxxxxxxxxxxxxxxxxxxxxxx | Step 4: the secret's Value (not its Secret ID) |
| Storage account name | stskyxops#### | Step 2 |
| Container name | skyxops-cost-exports | Step 3 |
| Folder prefix | exports/skyxops-export/skyxops-export-focus-cost | Step 7: the Directory, then /, then the export's name |
Orbit marks them as optional, but if either is empty, or the Folder prefix stops at the Directory, Orbit loads no costs and shows no error.
To check your Folder prefix, go to your storage account and open Storage browser > Blob containers > your container. Open folders until you see a dated folder such as 20261001-20261031. The Folder prefix is the path of the folder that contains the dated folders.
What happens next
- Orbit validates the connection: it checks the credentials, finds your subscriptions and checks that it can open the container
- Orbit loads costs once a day, for the previous day (UTC). Your first costs appear the day after the export's first successful run. Days before that don't appear automatically
- Your cost dashboards fill in as each day loads
Quick reference: error summary
For errors from the setup script, see "If the script stops" in the Cloud Shell script tab.
| Error | Cause | Solution |
|---|---|---|
| "Not supported" | Unsupported subscription type | Check billing agreement type |
| "RP registration in progress" | Resource provider registering | Wait 5 min, retry |
AccountCostDisabled | EA view charges not enabled | EA admin must enable |
AuthorizationFailed | Missing permissions | Need Owner/UAA role |
StorageAccountAlreadyTaken | Name not unique | Choose different name |
RequestDisallowedByPolicy | Azure Policy blocking | Add required tags |
| No data after 48 hours | Export not running | Check export run history |
| Export shows Succeeded but Orbit shows no costs | Folder prefix is empty or stops at the Directory | Fix it with Edit connection in Orbit (see Enter values in Orbit) |